setup_roxygen()3 Documenting Your Dataset
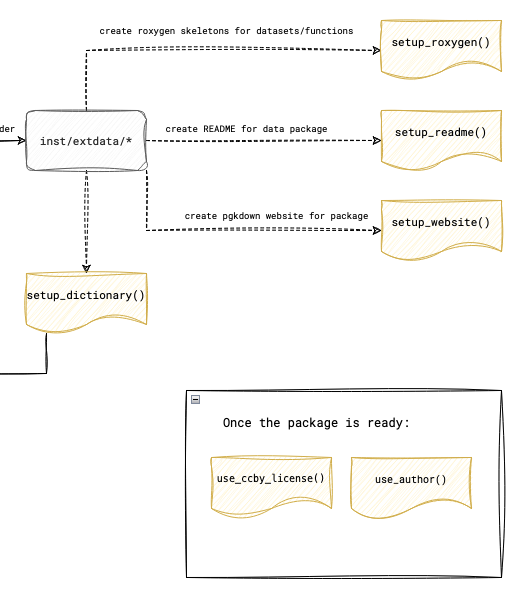
In the next steps, the goal is to document not only the dataset itself but also the functions and the package as a whole. The individual steps are visualized in the figure below.
3.1 Setting Up and Writing Documentation with Roxygen
To begin documenting your dataset, start by initializing Roxygen documentation. Open your R console within the project and run the following command:
This will create the necessary documentation files in the R/ folder of your project, setting up the foundation for detailed documentation.
3.1.1 Writing Documentation
Once the documentation files are generated, navigate to the R/ folder in your project. Each file in this folder, with a .R extension, represents a dataset or function. Open these files and provide a human-readable title and description using Roxygen comments (lines that start with #'). For instance, you could use the following format to document your dataset:
#' Title of Your Dataset
#'
#' A brief description of what the dataset contains and its purpose.
#'
#' @format A data frame with X rows and Y columns:
#' \describe{
#'   \item{column1}{Description of column1}
#'   \item{column2}{Description of column2}
#'   ...
#' }
#' @source Where the data comes from (if applicable)
"dataset_name"
This method allows you to provide clear, concise details about each dataset, ensuring that users understand its structure and purpose.
3.1.2 Updating Your GitHub Repository
Once you’ve completed the documentation, it’s time to update your GitHub repository. In RStudio, go to the “Git” tab. Stage all the changed files by checking the boxes next to them, then click “Commit”. Write a meaningful commit message, such as “Add Roxygen documentation for dataset”, and click “Push” to update your repository with the latest changes.
3.1.3 Finalizing and Installing the Documentation
Now that your documentation is written, run the following commands in your R console:
devtools::document()
devtools::check()
devtools::install()
These commands will generate the documentation from your Roxygen comments, check for any issues in the package, and install it locally. If you receive a warning about the license, don’t worry, as it will be addressed in the next section.
3.2 Updating the DESCRIPTION File
To complete your package documentation, you’ll need to update the DESCRIPTION file with author information and other key details.
3.2.2 Documenting Other Contributors
To ensure proper credit is given, create a new issue in your GitHub repository titled “Author Information for DESCRIPTION File”. List all contributors, including their full name, email address, role (e.g., aut for authors or ctb for contributors), and ORCID (if applicable).
For each additional contributor, run a similar command:
use_author(given = "Coauthor First Name", family = "Coauthor Last Name", role = "aut")3.2.3 Updating the DESCRIPTION File
After adding all contributors, open the DESCRIPTION file in your project and ensure the title and description reflect the purpose of your package accurately. Then, in your R console, run:
update_description()This will update fields such as version, authors, and dependencies. Review the DESCRIPTION file to make sure all information is accurate.
3.2.4 Documentation Check
To complete the process, run the following commands again:
devtools::document()
devtools::check()
devtools::install()
3.3 FAIR Documentation
The following steps are used to enrich and make metadata from your package more accessible to other users as well as search engines that index your website.
3.3.1 Adding Metadata files
Add metadata files that conform to dataspice, a lightweight metadata format for researchers. In your R console run:
add_metadata()This function will create supporting metadata files in the data/metadata folder of your package. The following metadata files are added:
- Bibliography (Temporal and Geographic Coverage, Citation, Keywords, Funding, and Licensing)
- Access (Access details for processed data)
- Creators (Author(s))
- Attributes (Description of variables in the dataset)
3.3.2 Updating Metadata Files
Metadata files are enriched automatically from existing metadata generated using all previous documentation steps from this guide. To do this, in your R console run:
update_metadata()Note: This function may report errors if all previous steps in the guide are not followed correctly!
After running the function, please open all metadata files to update blank fields as required.
3.3.3 Adding creators
In your R console, run:
add_creator(name="Jane Doe", email="jane.doe@mail.org", affiliation="Openwashdata")This allows addition of contributors. Run the function as many times as required to add contributors.
3.3.4 Creating JSON-LD documentation
JSON-LD versions of your package documentation allow search engines to index and find your website. This is an optional step if you plan to publish a website (next step in this guide) for your data package. To create a metadata.json file, simply run:
generate_jsonld()This will generate the JSON-LD file in the appropriate format and store it in the inst/extdata folder.
3.3.5 Final Documentation Check
To complete the process, run the following commands again:
devtools::document()
devtools::check()
devtools::install()
These steps will ensure your package is fully documented, checked for errors, and ready for use.