library(washr)
setup_rawdata()2 Preparing your dataset
Everything starts with a dataset that you want to publish. You might even have several datasets, some stored locally on your computer, others on an external hard drive or in the cloud.
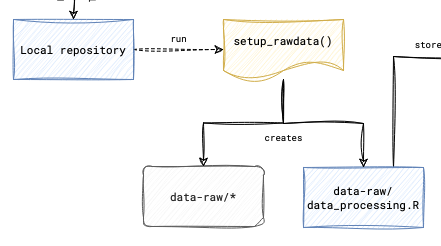
As a first step, you need to create a data directory where all datasets are stored in one place. To do this, open your R console within your project and type and execute the following command:
This command will create a new directory called data-raw in your project folder where you will store all your raw datasets. Copy or move all your files into the newly created data-raw directory.
Next, you’ll want to have this directory under version control so that you can track your changes.
In RStudio, locate the “Git” tab in the top-right panel. As a good practice, begin by clicking “Pull” to ensure you have the latest changes. In the Git tab, you will see a list of changed files—tick the checkboxes next to all the files you’ve added or modified. Next, click the “Commit” button. A new window will appear where you can enter a descriptive commit message, explaining what changes you’ve made (for example, “Add raw data files to data-raw directory”). Finally, click the “Push” button to upload your changes to GitHub.
2.1 Clean and Process Your Raw Data
Open the file data-raw/data_processing.R in your RStudio editor, which contains some pre-populated code. You’ll need to modify this script to fit your specific data cleaning needs. Add your own R code to clean and process your raw data files, ensuring that the script reads the files from the data-raw directory and outputs a tidy, well-organized version of the data.
After you’ve finished editing data_processing.R, run the entire script to execute your data cleaning process. You can do this by clicking “Source” at the top of the editor window, or by selecting all the code and clicking “Run.” This will process your raw data and produce a tidy version of the dataset, ready for analysis.
Return to the “Git” tab in RStudio, where you should see your modified data_processing.R file, along with any new output files that may have been generated. Commit these changes by entering a meaningful commit message, such as “Clean and process raw data.” Once you’ve committed the changes, push them to GitHub to ensure your updates are saved and accessible.
2.2 Creating a Data Dictionary
2.2.1 Set Up the Dictionary Template
In your R console, execute the command setup_dictionary(). This will create a new file called dictionary.csv in your data-raw directory.
2.2.2 Fill in the Data Dictionary
Next, open data-raw/dictionary.csv in a spreadsheet program like Excel or in RStudio’s data viewer. You will see columns corresponding to each dataset and variable in your tidy data. Focus on the “description” column: for each row representing a variable, provide a clear and concise description of what that variable represents. Include relevant information such as units of measurement, possible values, or any other pertinent details. Once you’ve completed this, save your changes to dictionary.csv.
2.2.3 Update GitHub with Your Data Dictionary
Return to the “Git” tab in RStudio, where you should see the modified dictionary.csv file. Commit these changes with a message like “Add data dictionary,” and then push your changes to GitHub.
Finally, review your GitHub repository online to ensure that all your changes have been uploaded correctly. You should now have a data-raw directory containing your original data files, a data_processing.R script in which you clean your data, and a dictionary.csv file describing your tidy dataset.
Congratulations! You’ve successfully prepared your dataset and created a data dictionary, all while maintaining version control with Git and GitHub.